


Aug 29 2019
Strain Gauge Fundamentals
Read More
Careers | Training | Resource!!!
Make the most of your strain gauge application and get the best possible results with HBM's videos.
These video tutorials guide you through all the essential steps that you need to install your strain gauge without any hassle.
HBM offers a variety of strain gauges that can also be purchased on the HBM Online Shop. After unpacking the strain gauge, place it on a clean glass surface and cover the strain gauge with an adhesive tape.
Cleanliness during the installation process is crucial to obtain accurate measurement results. Therefore, this video shows you how to prepare the surface before bonding your strain gauge.
Find out which materials strain gauges can be applied along with the relevant preparation method. To prepare your surface, the following materials are required: abrasive paper, a pen, cleaning agents, and cleaning pads.
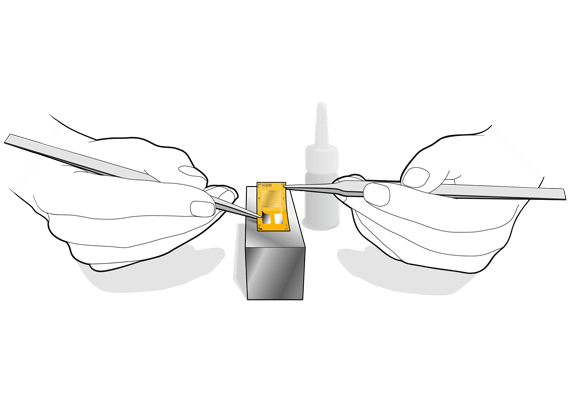
The strain gauge and the surface are now ready for the bonding process. For this process HBM offers a wide range of bonding materials for various applications.
This video illustrates the bonding process on a steel surface using a cold-curing adhesive.
– if not using pre-wired strain gauges –
Now that the strain gage has been glued on, the connecting cables still have to be attached to the strain gage. If the strain gage has soldering pads, soldering can be carried out directly on the strain gauge. If the strain gauge has leads, these are first soldered to a soldering terminal and then attached to a connection cable from there. This is more complex but has the advantage of additional strain relief and increases reliability in continuous oscillation tests with high amplitudes.
After curing the adhesive, it is important to ensure that the strain gauge has been installed correctly.
Visually examine whether the strain gauge appears even. Then use an ohmmeter to double-check the isolation and volume resistance of the strain gauge.
Note that a faulty installation will lead to inaccurate measurement results.
Learn how to create a strain relief for the strain gauge installation. It should be noted that mechanically protecting the installation cables also protects the strain gauge from other external material impacts.
X60 is an excellent adhesive for strain relief installations.
This video shows you how to easily connect the pre-wired strain gauge as a quarter bridge to the MX1615B/MX1616B bridge amplifier module via the easy to clamp connector 1-CON-S1015.
No soldering of cables is required for this process.
Additionally the strain gauge is parameterized. We also show you how to conduct peak-valley and rainflow analyses, as is often used in durability testing.
HBM offers a wide range of strain gauges for a variety of applications.
One such strain gauge is the LB11, which is a cylindrical electrical foil strain gauge suitable for use in screws to measure the axial force.
Watch this video and learn how to integrate the cylindrical strain gauge LB11 into a measurement screw. You will also find out how to wire the screw to a ready-to-use connector with a bridge amplifier module.

This will bring together HBM, Brüel & Kjær, nCode, ReliaSoft, and Discom brands, helping you innovate faster for a cleaner, healthier, and more productive world.
This will bring together HBM, Brüel & Kjær, nCode, ReliaSoft, and Discom brands, helping you innovate faster for a cleaner, healthier, and more productive world.
This will bring together HBM, Brüel & Kjær, nCode, ReliaSoft, and Discom brands, helping you innovate faster for a cleaner, healthier, and more productive world.
This will bring together HBM, Brüel & Kjær, nCode, ReliaSoft, and Discom brands, helping you innovate faster for a cleaner, healthier, and more productive world.
This will bring together HBM, Brüel & Kjær, nCode, ReliaSoft, and Discom brands, helping you innovate faster for a cleaner, healthier, and more productive world.